


The v0.4.0 version with Vosk local caption engine has been released. Currently the local caption engine does not include translation, the local translation module is still under development...


Star History
📥 Download
📚 Related Documentation
Caption Engine Explanation Document
Project API Documentation (Chinese)
📖 Basic Usage
Currently, installable versions are available for Windows and macOS platforms.
The international version of Alibaba Cloud services does not provide the Gummy model, so non-Chinese users currently cannot use the Gummy caption engine.
To use the default Gummy caption engine (which uses cloud-based models for speech recognition and translation), you first need to obtain an API KEY from the Alibaba Cloud Bailian platform. Then add the API KEY to the software settings or configure it in environment variables (only Windows platform supports reading API KEY from environment variables) to properly use this model. Related tutorials:
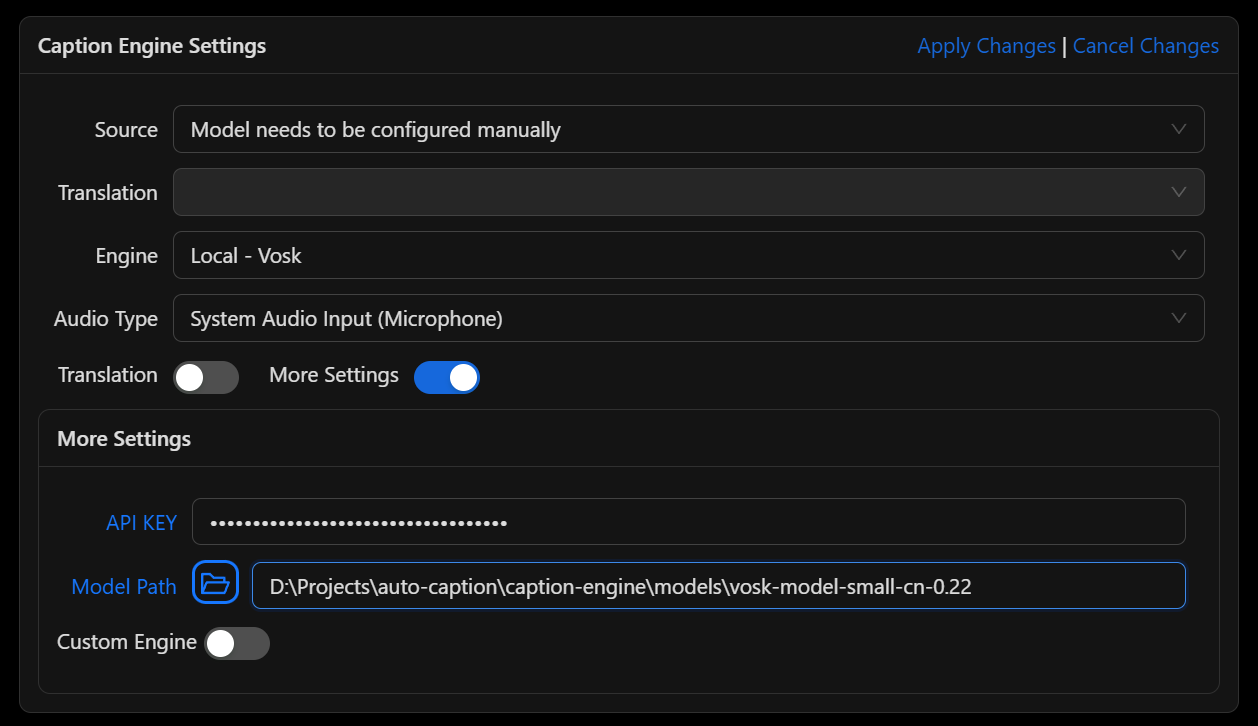
The recognition performance of Vosk models is suboptimal, please use with caution.
To use the Vosk local caption engine, first download your required model from Vosk Models page, extract the model locally, and add the model folder path to the software settings. Currently, the Vosk caption engine does not support translated captions.
If you find the above caption engines don't meet your needs and you know Python, you may consider developing your own caption engine. For detailed instructions, please refer to the Caption Engine Documentation.
✨ Features
- Multi-language interface support
- Rich caption style settings
- Flexible caption engine selection
- Multi-language recognition and translation
- Caption record display and export
- Generate captions for audio output and microphone input
Notes:
- Windows and macOS platforms support generating captions for both audio output and microphone input, but macOS requires additional setup to capture system audio output. See Auto Caption User Manual for details.
- Linux platform currently cannot capture system audio output, only supports generating subtitles for microphone input.
⚙️ Built-in Subtitle Engines
Currently, the software comes with 2 subtitle engines, with 1 new engine planned. Details are as follows.
Gummy Subtitle Engine (Cloud)
Developed based on Tongyi Lab's Gummy Speech Translation Model, using Alibaba Cloud Bailian API to call this cloud model.
Model Parameters:
- Supported audio sample rate: 16kHz and above
- Audio sample depth: 16bit
- Supported audio channels: Mono
- Recognizable languages: Chinese, English, Japanese, Korean, German, French, Russian, Italian, Spanish
- Supported translations:
- Chinese → English, Japanese, Korean
- English → Chinese, Japanese, Korean
- Japanese, Korean, German, French, Russian, Italian, Spanish → Chinese or English
Network Traffic Consumption:
The subtitle engine uses native sample rate (assumed to be 48kHz) for sampling, with 16bit sample depth and mono channel, so the upload rate is approximately:
The engine only uploads data when receiving audio streams, so the actual upload rate may be lower. The return traffic consumption of model results is small and not considered here.
Vosk Subtitle Engine (Local)
Developed based on vosk-api. Currently only supports generating original text from audio, does not support translation content.
FunASR Subtitle Engine (Local)
If feasible, will be developed based on FunASR. Not yet researched or verified for feasibility.
🚀 Project Setup
Install Dependencies
npm installBuild Subtitle Engine
First enter the caption-engine folder and execute the following commands to create a virtual environment:
# in ./caption-engine folder
python -m venv subenv
# or
python3 -m venv subenvThen activate the virtual environment:
# Windows
subenv/Scripts/activate
# Linux or macOS
source subenv/bin/activateThen install dependencies (note: for Linux or macOS environments, you need to comment out PyAudioWPatch in requirements.txt, as this module is only for Windows environments).
This step may report errors, usually due to build failures. You need to install corresponding build tools based on the error messages.
pip install -r requirements.txtThen use pyinstaller to build the project:
pyinstaller ./main-gummy.spec
pyinstaller ./main-vosk.specNote that the path to the vosk library in main-vosk.spec might be incorrect and needs to be configured according to the actual situation.
# Windows
vosk_path = str(Path('./subenv/Lib/site-packages/vosk').resolve())
# Linux or macOS
vosk_path = str(Path('./subenv/lib/python3.x/site-packages/vosk').resolve())After the build completes, you can find the executable file in the caption-engine/dist folder. Then proceed with subsequent operations.
Run Project
npm run devBuild Project
Note: Currently the software has only been built and tested on Windows and macOS platforms. Correct operation on Linux platform is not guaranteed.
# For windows
npm run build:win
# For macOS
npm run build:mac
# For Linux
npm run build:linuxNote: You need to modify the configuration content in the electron-builder.yml file in the project root directory according to different platforms:
extraResources:
  # For Windows
  - from: ./caption-engine/dist/main-gummy.exe
    to: ./caption-engine/main-gummy.exe
  - from: ./caption-engine/dist/main-vosk.exe
    to: ./caption-engine/main-vosk.exe
  # For macOS and Linux
  # - from: ./caption-engine/dist/main-gummy
  #   to: ./caption-engine/main-gummy
  # - from: ./caption-engine/dist/main-vosk
  #   to: ./caption-engine/main-vosk